Here at Tube-Wringer, we like to provide fun ways for you to use our products. While the standard use is to squeeze every drop of paint, paste, or cream from a tube – the Tube-Wringer has a lovely crimping ability that is fun to explore.
However, in a world where you have to use trial and error, there are bound to be many, many mistakes.
For example, I tried to crimp salt dough when making holiday ornaments with my daughter. That made the dough fall apart completely and left me with little bits to mush back together. Luckily, salt dough is very forgiving. Small children – not so much. I found out later from an amazing jewelry maker that polymer clay is what you need if you want to crimp something clay-like.
Then I tried to crimp some mesh ribbons as I wrapped presents. That did not work. One little bit.
You may be sensing a theme here, but there were some bumps in the road to creating a pretty crimped bead.
Papercrafting with a Tube-Wringer
As I have explored different fun paper crafts, I have found that pretty much all paper will hold a crimp – but some hold it better than others.
So, when most YouTubers recommended I use magazine paper for this craft, I decided to try several different types of paper instead:
- Magazine page paper
- The heavier stock used on the magazine cover
- Regular, 20 lb stock
- Construction paper
- Card stock
For those of you who want to get to the crafting, the card stock was the winner.
Everything else lost its crimp to some degree – with the magazine page paper barely holding a crimp in the first place. I tried two workarounds:
1. Re-crimping the end of the bead before gluing it down. That sort of worked, but it was awkward and imperfect.
2. Crimping the whole bead. This worked best with construction paper as you can get the round shape back with more malleable paper. I tried it was card stock and the bead ended up more square – which could be a good look if that’s what you’re going for.
Now that you have heard my bead-making struggles, I will carry on to the main event.
Make Your Own Crimped Paper Beads
Paper beads are pretty fun and easy to make – as long as you don’t mind glue on your fingers. Here’s what you will need:
- Heavy Stock Paper (we recommend cardstock)
- Scissors
- Glue
- Modgepodge or watered-down glue
- A brush
- Your Tube-Wringer (We used the Light Duty for this craft)
- A toothpick or chopstick
Directions:
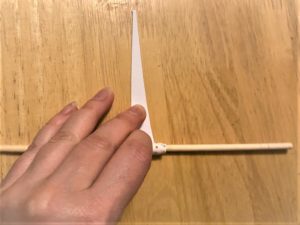
1. Cut the paper in a long, thin, triangle. You can use a ruler to get a nice, clean cut.
2. Next, crimp your heavy paper. You can run in through your crimper once for a wavy pattern, or a couple of times to get a cross-hatched effect.
3. Place your paper on the table and use your toothpick or chopstick to roll the bead from the thicker end to the thinner end. Don’t roll it too tight or you will lose some of the crimping detail.
*Quick hack, no toothpick/chopstick? No problem! The crimping creates a pre-folded texture that makes it easy to roll a bead without additional implements. Just add a little glue to the middle of the bead to help things stay together.
4. Glue the end of the bead down.

*Fun idea to try: At this point, I tried running one of my beads back through the Tube-Wringer. If you are careful with your angles, you can get a crimped, rectangular bead that looks pretty neat.
5. Paint the whole bead with ModgePodge or watered-down glue. Then let it dry.
*Run a string through the bead and hang to dry if you don’t have a toothpick or chopstick.
6. Once it’s all dry (about 3 hours), you have a pretty paper bead!
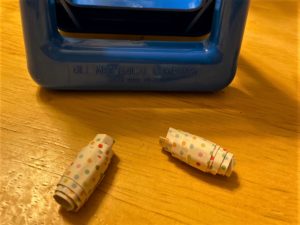
This craft is simple and fun, just make sure you use a heavy stock and you will have a lovely little bead with a cute crimp detail.
Are you looking for a Tube-Wringer to use in your craft projects? Click here to shop!